Intro
In this topic, we will approach the importance and possible benefits of a good and organized high pressure. Is not easy to play 90 minutes pressuring on the opponent’s half, but in some moments of the game, it can make the difference. This is the kind of game situation where you don’t need extremely talented players, but hard workers, solidary and organized. When applied right and as a unit, high pressure can force errors and cause some serious damage to your opponent. Although, if it’s not done together, can open gaps in between the lines, and good teams will see that as breakdown opportunity.
Theoretical Approach
One of the most important things when applying high pressure is the timing. When do we go? How do we go? That’s why it’s fundamental for your players to be in symphony and know when to go. A simple way to do this is to have a signal, like a word, that is shouted when that pressure is applied and all the team reacts to it focusing in one single thing – get the ball back as fast as possible. Situations like a bad pass from the opponent, a pass back, or a ball played in the back of their defensive line are the most common moments where a team can step forward and make pressure. Not only to the player with the ball, but also to his closest passing lines. Pressure should be made while the ball is travelling to arrive to the opposition at the same time as the ball and force a bad pass or pass back.
Another very important aspect to be aware when this high pressure is applied is to keep the opponent in one side of the field. For example, in the first two thirds of the field, cut the outside pass, forcing them to go the middle where you have more players, and avoiding the switch of the play. More players in small areas, more chances to get the ball back and force mistakes.
Things to get from High Pressure

Practical Application
Below, there are some exercises that you can do to work on an efficient and organized high pressure:
Drill 1 – Ball Possession 5×2 with variation

Description
- 3 Rectangles. Possession is made in the bigger ones (5×2), with the other 3 players of the pressuring team staying in the middle one waiting on either to pressure when the ball switches sides or to occupy the one where the ball was won;
- To pass the ball to the other rectangle, the team has to make at least 7 passes (switching pass has to be below knee height);
- If the two yellows win the ball, the reds restart and the blues should pressure with 2 men, leaving 3 in the middle;
- 3 Touches maximum.
Goals
- When pressuring, they should get there as fast as possible, with one player on the ball and the other trying to pressure the next pass;
- Offensively, move the ball quickly and be patience, choosing the right moment to switch it;
- Every time a team passes the ball to the other rectangle successfully, won 1 point.
Dimensions
- Yellow Rectangles – 20m x 15m;
- Blue – 20m x 5m.
Variables
- In the first part, the players in the middle cannot intercept the pass to the other rectangle;
- After a break, the players in the middle can intercept the ball;
- The pass has to be below knee height.
Drill 2 – Ball Possession 1+6×1+6

Description
- Place 3 cones in a triangular shape in both ends, 3 yards each side;
- GK stay inside and are used as targets. They can either hold or receive the ball. They can play on the offensive process, but are always the target to the opposite team to score;
- Every time the GK receives a pass inside the triangle, point for that team;
- The passes can be made from every area of the field.
Goals
- Defend as high as possible, avoiding the long pass and pressuring the opponent right after the first touch;
- Stay organize and move together;
- Steal the ball in a high area and reach the target immediately.
Dimensions
- Width: edge of the box until half way line;
- Length: both side lines
Variables
- During the first part, you can only score by passing the ball to the keeper;
- Second part, recovery on their own half and score with less than 3 passes is 2 points.
Context
- Work on cutting passing lines in a high area of the field;
- Chose the right moment to pressure – back pass, bad first touch and when the ball travels;
- Very useful to use on the final third, close to the opponents goal.
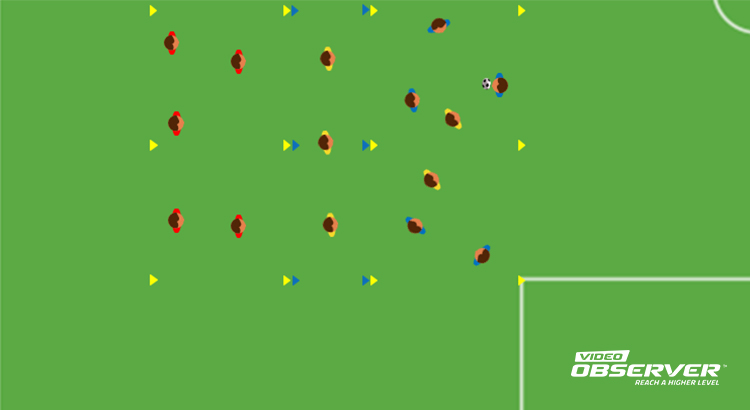
Drill 3 – Ball Possession 1+6×6 High Pressure in one side

Description
- The team that we want to focus on is the one defending the gates (yellow);
- 3 gates: one central, one wide, and one vertical, representing the change of the point of attack;
- Pressure as high as possible (do not pressure the keeper);
- To score a goal the blue team has to pass the ball through the gates (on the vertical gate the score can be done with a pass; the other two has to be with the ball under control);
- If the ball is recovered, the score should be done on the biggest net.
Goals
- Pressure on the final third, keeping them in one side, making the play predictable;
- The higher players on the pitch are responsible to chose the moments of pressing;
- Avoid switching the point of attack.
Dimensions
- Width: 3/4 of the field
- Length: Midfield line
Variables
- Half of the exercise: forcing them to stay in our left and the other on our right;
- After the players get use to it, the vertical gate worth’s 2 points, and the half way gates 1 point;
- Win the ball and score with less than 5 passes, 2 points.
Context
- Great exercise to work on pressuring shape and make our opponent moves predictable;
- Ideal to prepare games against teams that like to play from the back, by lock them into one side of the field.